Improving the Most Obnoxious of Chores: Homemade, Natural Laundry Detergent

For the first couple of months after our first couple of months in Buffalo, our first apartment together didn’t have a washer or dryer. I would haul three or four bags in 100% humidity and 100 degree heat to the laundromat around the corner that was owned by a Burmese immigrant every week just to clean our clothes. While I was always offered free coffee and free help by the men in the store, every afternoon would ultimately result in me struggling hard with big loads and big machines in the horrific conditions until I sweat all over the fresh laundry. Then there’s the folding, and the pushing a mountain of items into your overstuffed dresser, and the hanging on crappy hangers…And who doesn’t love when you forget to flip your clothes and they get to stinking like rotting foliage in the washing machine overnight? Just perfection.

What is that phrase that young folks say nowadays? “First world problems.” But really, I consider it more of an urban dilemma; I would happily wash my clothes in a clean, cool, nearby creek instead of in a hot vat of store-bought chemicals. You know, if there were a creek in the backyard instead of neighbors and all their own chemical backwash.

As part of my determination to purge harmful chemicals from our household, I made a list of all the different products that taint us by going in our mouths, touching our skin, etc. Laundry detergent makes that list, and like many other household products, affects both the human body and the surrounding environment. This goes beyond common concerns about impacts on the watershed in a give area; these products also negatively affect the air quality in our homes because of toxins that they emit and aren’t packaged in an easily reusable design, contributing to more plastics in landfills (when people don’t recycle) and in recycling (which can release toxic fumes in the recycle process) rather than being used again right at home. By making your own laundry detergent, you help to solve all of these problems. Better for the environment, better for you, and amazing for your clothes, this laundry detergent is cheap, easy, effective, smart, adaptable, HE-compatible, and smells great! With the inspiration I derived from Wellness Mama and Bonzai Aphrodite, I’ve got my own blend that has worked well for us.

Tip: You need a funnel, a 2 gallon pot, and 2 empty laundry jugs to make this recipe.

This will take a while...plan for about 20 minutes. Seriously.

This will take a while…plan for about 20 minutes. Seriously.

Summer Garden Laundry Detergent
1 bar castile soap (I use Kirk’s – good quality and cheaper than Dr. Bronner’s)
Water
Washing soda (had a bit of a hard time finding, Tops or Wegmans if you’re a WNY’er)
Borax
Baking soda
Ylang ylang essential oil

– Grate half a bar of castile soap on an old cheese grater (smallest or second-to-smallest grates will both work). I have found it useful to have a cheese grater specifically for kitchen work, and another specifically for household work – but it’s not necessary as long as you clean all that soap off of it well.

Bubble, bubble...

Bubble, bubble…

– Add soap to a large 2 gallon pot (we got ours for making beer) and dissolve it in a half gallon of water on medium-low heat. This should only take a few minutes (less than ten). Be sure to stir through and double check that the soap is completely dissolved, keeping in mind that using the second largest grate hole will mean waiting a bit longer to dissolve the soap.

Almost ready to do all the hard work for you!

Almost ready to do all the hard work for you!

-Right before you are ready to take the soap and water off the stove, begin running your hot water faucet until the water gets really, reeeeally hot. Remove the pot from the burner and add 1.5 gallons of that really hot water, stirring very gently. Then, add 1/2 cup of washing soda (sodium carbonate), 1/2 cup of baking soda (sodium bicarbonate), and 20-30 drops of ylang ylang essential oil (or to “taste”).

Gotta have all your stuff together.

Gotta have all your stuff together.

– Fill one laundry jug with this mixture by placing a funnel in the spout and gently pouring the detergent in. This is your “dark load” detergent. Then, set the pot back down and add about 1/2 cup of Borax to the pot and stir gently one more time. Fill the second laundry jug with the remaining detergent; this is your “light load” detergent. You’ll want to take note of the distinction, because one downside of the Borax is that it can make darker colors, particularly blacks, fade faster than you’d probably like. So, label! Or, if you’re like me and have jugs of different design on hand, I would recommend putting the “lights” detergent in the lighter jug.

Tip: Because you tend to run out of dark load detergent faster (most of us wear more darks than lights), I have a third and even fourth jug on hand so that you can make the batches only as you need them. Ask friends, neighbors, coworkers, or even laundromats for their empties so you can have backups, too.

And that’s it! Let the detergents cool overnight, shake, and use less than a 1/2 cup for a normal/large load! If you want to put vinegar in a fabric softener ball for the rinse cycle, you certainly can, but I can tell you I don’t bother. This recipe is so cheap. I paid 2-something for each box of Borax and washing soda, 99 cents for the bar of castile soap, less than 75 cents for a box of baking soda, and less than $10 for ylang ylang – plus, I use most of these ingredients in other products. Also, the jugs are technically free because they are reused.

Yup, we just made laundry better.

Note: The Environmental Working Group and other organizations note potential health hazards to using Borax; the EWG rates it as an “F” on its website www.ewg.org. You do not have to use Borax at all; you can increase the washing soda just a bit, and definitely increase the baking soda, to compensate. On a personal note, I don’t think a 1/2 cup of Borax in a huge jug of laundry detergent and airtight storage is a dangerous level of exposure, but it is up to you to decide. I wanted to try the recipe with it and without it, and while my whites come out very very clean, it is probably not entirely necessary. Rather than dump it, I am choosing to use it until it’s gone.
The rest of the ingredients in this recipe are rated very well by the EWG and are considered safe for humans and the environment.

In the Pits – Homemade Deodorant and You

Yeah, this is happening.

Yeah, this is happening.

Back in March….

I knew I was sick this morning when I got out of bed only to drag my leaking nose and sore throat across the house to the couch, squinting and groaning as my husband opened the curtains to reveal a sunny sky and retreating gratefully into the warmth of my comforter. The outside light is still just too much. I sit here with my favorite sitcom on (How I Met Your Mother) and a collection of pills, salves, and other fixer-uppers; you’ll notice specifically my homemade lip balm, a bag of Burt’s Bees Honey Natural Throat Drops, and multiple vitamins.

Ever since I got back from Florida, my health has been on a steady decline. First, it was my eye, which developed a weird, non-pink eye pink eye sort of redness and irritation. The cold I have is an unfortunate addition, too. But the worst thing of all is the curious rash(es) I developed.

Pretty graphic...

Pretty graphic…

Now, I believe the first one was an allergy to laundry detergent, since it was less a rash than it was a bunch of non-red, non-itchy, raised little bumps only on my torso where I wore the washed shirt I believe to be the culprit. But this next one…this rash is awful. Irritated, itchy, red, slowly but definitively spreading, and covering my armpit and even taking over my tasteful sideboob. The problem began in Florida, where I was shaving a lot (almost every day) and applying a lot of deodorant. The other problem was spending a lot of time in the sand, sun, and surf while not showering every day because our skin would dry out. At that point, things weren’t too bad. But since I’ve gotten back, it’s just gotten worse and worse, particularly since I sweat so much at work!

Some of the best defenses for this ailment

Some of the best defenses for this ailment

To take care of my poor skin, I’m taking a number of precautions: 1) I’m not shaving until the skin is healed, 2) I’m not wearing my homemade deodorant until the skin is healed because the baking soda can be irritating to those with sensitive skin like me, 3) I’m washing all my bras, shirts, and anything that comes in contact with the pits with an extra rinse cycle to get any potential soap residue out, 4) I’m eating lots of vitamin C to boost my immune system, in addition to relaxing and smiling, 5) I’m putting plain coconut oil on my armpits, which is antifungal, antibacterial, and very soothing/healing to the skin and body, and 6) I’m staying well hydrated so my skin has the tools it needs to get better.

I'm considering making a new label for this baby!

I’m considering making a new label for this baby!

In the meantime, I won’t be able to use my incredible homemade deodorant, but my husband loves it! Now that he’s tried it and liked it long enough, I’ll be making him his own, which means I will no longer have to pick his armpit hairs out of it (boys are gross). I call my deodorant Texas Tea because, among other scents, it combines tea tree oil and Texas cedarwood essential oil (plus it’s funny because, instead of having deodorant manufactured and shipped, mine’s made right here! So it’s ironic, too). It withstood the test of its effectiveness in Florida (and in 4 days spent in the car), and it works great while I’m waitressing! I always smell like coconuts. So, needless to say, I’m never going back to store-bought. I hope you enjoy it as much as I have!

Natural Homemade Deodorant: “Texas Tea”
1/4 c. baking soda
1/4 c. cornstarch
8 tbsp. organic, unrefined, virgin coconut oil
5-10 drops tea tree oil
5-10 drops Texas cedarwood oil

UPDATE, 4.11: My plans to get better were all well and good, but better said than done. Along with those rashes, I was consistently sick with a “cold” for weeks, and I have only just now finished the antibiotics that my doctor prescribed me with for my bad sinus infection a few days ago. I’m finally returning to normal! And, finally, I’m back to wearing my AWESOME deodorant!

I also highly recommend scouring the internet for the many, many health and body benefits of coconut oil.

Do You Kiss Your Mother with That Mouth?

Now you can, because you’ll be brushing with natural homemade toothpaste.

Image from soap.com

There are a number of reasons why I’m not in love with your traditional toothpaste: 1) It, like many other cosmetics, bath products, and toiletries is home to many unpronounceable, unrecognizable chemicals that you can’t find in the backyard (anyone’s backyard, anywhere); 2) One can’t be positive if it is vegetarian/vegan because ingredients like glycerin can be sourced from plant or animal sources, and it frequently depends on such variables as market values; 3) It’s full of sugar, which I feel is counter-intuitive to good dental health, particularly when we’re supposed to cut processed sugars out of our diet in the first place; and 4) It’s friggin’ expensive and often gross.

I have teeth that are chipped, teeth with deeper-than-normal grooves, teeth that have been stained with countless coffees and wines, teeth that have gone years without seeing a single professional, teeth that have often gone without flossing (save your negative commentary for someone who has bad plaque buildup), teeth that are sensitive to too-cold and too-warm and sometimes even the very toothpastes intended to help them, teeth that are worn down from night grinding and clenching.

Of course, I can’t pretend I’m some sort of expert on dental health. And I haven’t yet been to a dentist to test how well my homemade toothpastes have worked on my mouth (I will certainly update once I go!). But I have been doing my research, and many dentists support the efficacy, safety, and benefits of using simpler, natural ingredients like vinegar, baking soda, unsweetened cranberry juice, and oils (essential and otherwise) in our mouths. These everyday kitchen ingredients (and everyday ingredients for “crunchers” like me, like the 54 oz. of coconut oil in my cabinet) keep our teeth and gums healthy and strong, the risk of gingivitis down, any incidence of the strep virus low to nonexistent, and most importantly, our bodies remain chemical-free.

My first adventure with homemade toothpaste was somewhat difficult. The paste itself was great–thick and pasty, easy-to-use–but the recipe was absolutely repulsive to have to taste. As someone who was forced to gargle with salt water after lost teeth as a child, one can imagine how gag-worthy a toothpaste made of only baking soda, sea salt, water, and tea tree oil might be to me. I got choked up more than a few times, and not because I was so proud of my accomplishment as a “homemaker.” Why did I keep using it? Because I knew it was the healthier option, and, well, let me tell you: I could eat a ton of garlic, brush my teeth with this toothpaste five minutes later, and have absolutely no trace of my indulgence at work or play! That’s one effective toothpaste right there.

All my ducks in a row so I can get cookin'!

All my ducks in a row so I can get cookin’!

I haven’t had the chance to perform the garlic test with my new toothpaste recipe; however, my mouth definitely feels clean when I’m done brushing, and the taste is far easier on the tongue. It may be tough for some of you to get used to; the coconut oil is fairly solid at room temperature, so you scrape the paste onto your brush and then wait as it melts in your mouth, which can be mildly disconcerting at first. However, the coconutty, fresh taste and clean feeling that you are left with when you are done are worth the getting-to-know-you period.

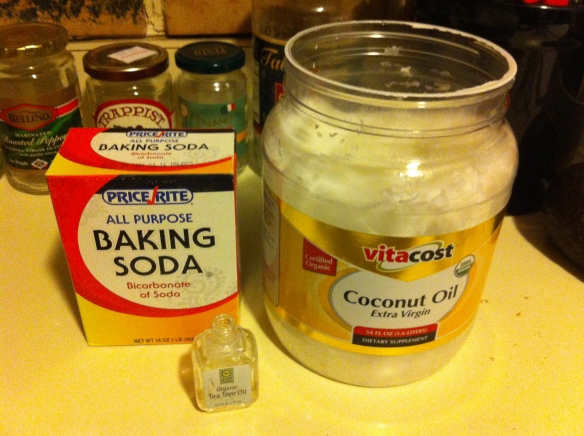
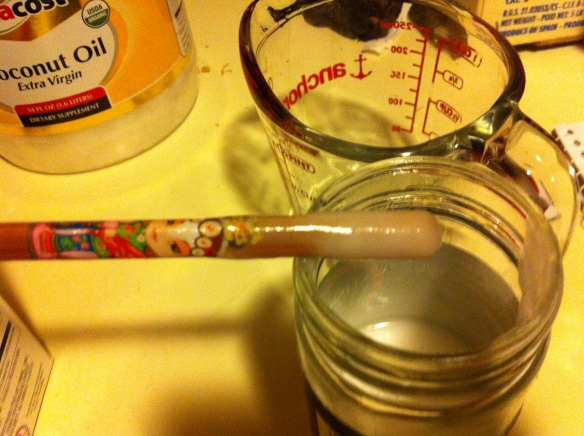
It’s pretty easy to make this toothpaste. First, gather your ingredients together: coconut oil, tea tree oil, and baking soda. It’s just easier if they’re all together. And make sure you have your measuring spoons and other “ware” at hand, as well as the container you’re going to put the toothpaste in! I use a simple jar (in fact, I haven’t even removed the original label yet).

Just 3 ingredients! Couldn't be easier.

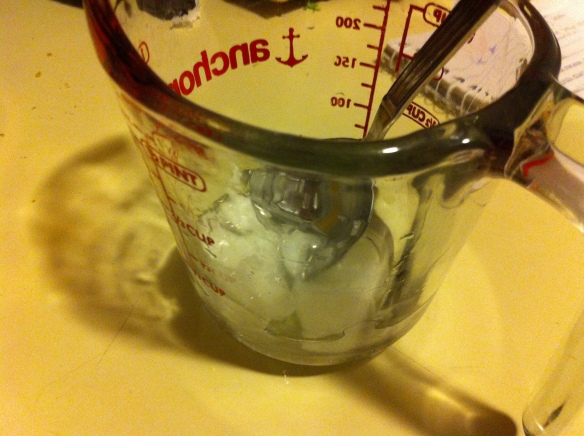
Next, you’ll measure out the coconut oil and melt it in the microwave until mostly melted. If your microwave has heat settings, I would set it in the middle, around level 5 in our microwave.

Coconut oilFinally, measure your baking soda and add the tea tree oil if you desire to the coconut oil and stir thoroughly. The tea tree oil is nice because it is antibacterial, and will kill the germs while leaving you with a pleasant (in my opinion) feeling and smell. Once incorporated, transfer the toothpaste to your jar. The consistency will be thicker, but more fluid than conventional toothpaste and far less stiff than the final product. You can see that in the picture below.

IMG_0353Once it sets fully, your toothpaste will stiffen. If you have the time and want to make the extra effort, you can warm it up before use it so it’s not solid. However, it’s fun to scrape it up with your toothbrush and wait for it to melt in your mouth! Here’s the exact recipe, but you can always adjust the measurements to suit your tastes (literally!):

Homemade Toothpaste
4 tbsp. coconut oil
7 tbsp. baking soda
dash of tea tree oil

If you are feeling daring and, perhaps, eat a lot of garlic to the detriment of your love life or working relationships, here is my original toothpaste recipe:

Homemade “Raw” Toothpaste
1/2 c. baking soda
2 tsp. sea salt
dash of tea tree oil
1-2 tsp. water

When using either toothpaste, I would recommend rinsing your mouth very thoroughly after brushing; this gets the leftover baking soda out of your mouth. You can also make your own natural mouthwash with half-strength vinegar or unsweetened cranberry juice (I prefer the unsweetened cranberry juice).

I can’t recommend making the transition highly enough, particularly if you have children. Why keep a toothpaste in the house that, once in your mouth, you should worry about swallowing?!  Why keep a toothpaste in the house that you have to keep away from your children?! Getting them to brush in the first place can be tough enough without making it seem like a necessary parent-assisted activity.

But even more important for dental health is cutting out processed sugars and foods. And honestly, my mouth never felt cleaner and healthier than when we switched to a vegan diet. No one has to go vegan to have a cleaner mouth, but putting an end to mornings of sugary cereal, followed by lunches and snacks of chips and flavored crackers and desserts of store-bought cookies and cakes will certainly make your teeth less grimy. When I read at the age of 20 in Michael Pollan‘s In Defense of Food that people in other lands don’t do anything (or do very little) for “dental health” besides eat only “clean” foods as is consistent with their culture, I almost didn’t believe it. But I’ve lived to tell the tale of how disgusting those processed foods really made my mouth feel, compared to how wonderful my teeth and cheeks feel now! This, of course, doesn’t mean I haven’t had ANY indulgences–of course I’ve had a couple–but overall, my mouth and diet get pretty high scores 🙂

What are your thoughts on mouth health? Does anyone do oil pulling with success? Write in and let me know, or share your recipes/experiences with natural toothpastes! And of course, write in with any questions 🙂

Implied Ingredients: A Short Note on Pantry Items

Some of you may have noticed that I leave a number of ingredients out of the lists of tagged items, and they therefore do not show up in the ingredients cloud. However, in doing so, I felt I should mention a bit about why this is so, and what exactly is frequently left off of my tag lists.

Implied in my ingredient lists is a distinction between “to be bought” and “already bought” items. To me, “already bought” items include things that one “stocks up on,” such as salt & pepper or oil. I have tried to keep it as simple as possible, and tried to keep my own values out of this distinction. For example, many people, students included, have sugar available in their home, but brown sugar is one of those things that sort of runs out, is forgotten the next few times at the store, and then needs to be bought once again. It benefits the person cooking to have that on a tagged list in order to serve as a warning: if you don’t have brown sugar or a way to make brown sugar, this recipe will disappoint you. “To be bought” items would be things like particular vegetables, meats, breads, and other foods that don’t necessarily sit around one’s house. My apartment is always stocked with broccoli, but I wouldn’t imagine this is true for everyone; hence, its “to be bought” status.

Basically, “already bought” items are pantry items: the things that sit around your house, waiting to be included in your next food venture. Here’s a list of the items you may not see tagged in my recipes, but will frequently find required:

White flour
White sugar
Oils (Canola and Vegetable, which are basically interchangeable)
Butter
Salt, pepper, herbs, and spices
Milk
Eggs (as ingredient, not feature item – I tagged eggs in mayo, for example)
Baking soda
Baking powder
Water
Mayonnaise
Vinegar (white)

Beyond these ingredients, you will find your ingredients tagged and part of the ingredients cloud.